


Food drying was invented somewhere in 12,000 BC by inhabitants of the Middle East and Asia regions where methods such as air drying, sun drying, smoking, and wind drying were commonly used. The electric food dehydrator was only introduced in 1795 which made the practice much more easier.
Dehydrating is usually done by removing any water content from the food to inhibit the growth of bacteria, yeast, and mold so that the product can be stored for longer. The dehydrated food, especially dehydrated vegetables and dried fruits are then used as healthy snacks or as essential ingredients in dishes and drinks.
In this guide, we’ll show you how to dehydrate vegetables.
What Type of Vegetables Can You Dehydrate?
You can dehydrate a wide range of vegetables. Here are some popular choices:
- Tomatoes
- Carrots
- Zucchini
- Onions
- Peppers
- Kale
- Mushrooms
- Sweet potatoes
- Brocolli
- Cauliflower
- Corn
- Beets
- Cabbage
- Eggplant
- Bell peppers
- Green beans
Note: Avoid raw vegetables that have a high water content like cucumbers, lettuce, and celery. They tend to become very limp and lose their texture when dried.
What Type of Dehydrator Should You Choose?
There are mainly two types of dehydrators to consider: stackable tray dehydrators and shelf tray dehydrators.
Stackable tray dehydrators are typically more compact and budget-friendly. They consist of trays that stack on top of each other, with a fan located at the base or the top. These are great for casual users or those with limited space. However, the heat distribution can be uneven.
On the other hand, shelf tray dehydrators feature a cabinet design with trays that slide out like shelves, and a fan is usually located at the back. This design allows for more uniform heat distribution. They’re ideal if you dehydrate fruits and vegetables regularly.
How to Dehydrate Vegetables
Here’s a step-by-step guide on how to dehydrate vegetables:
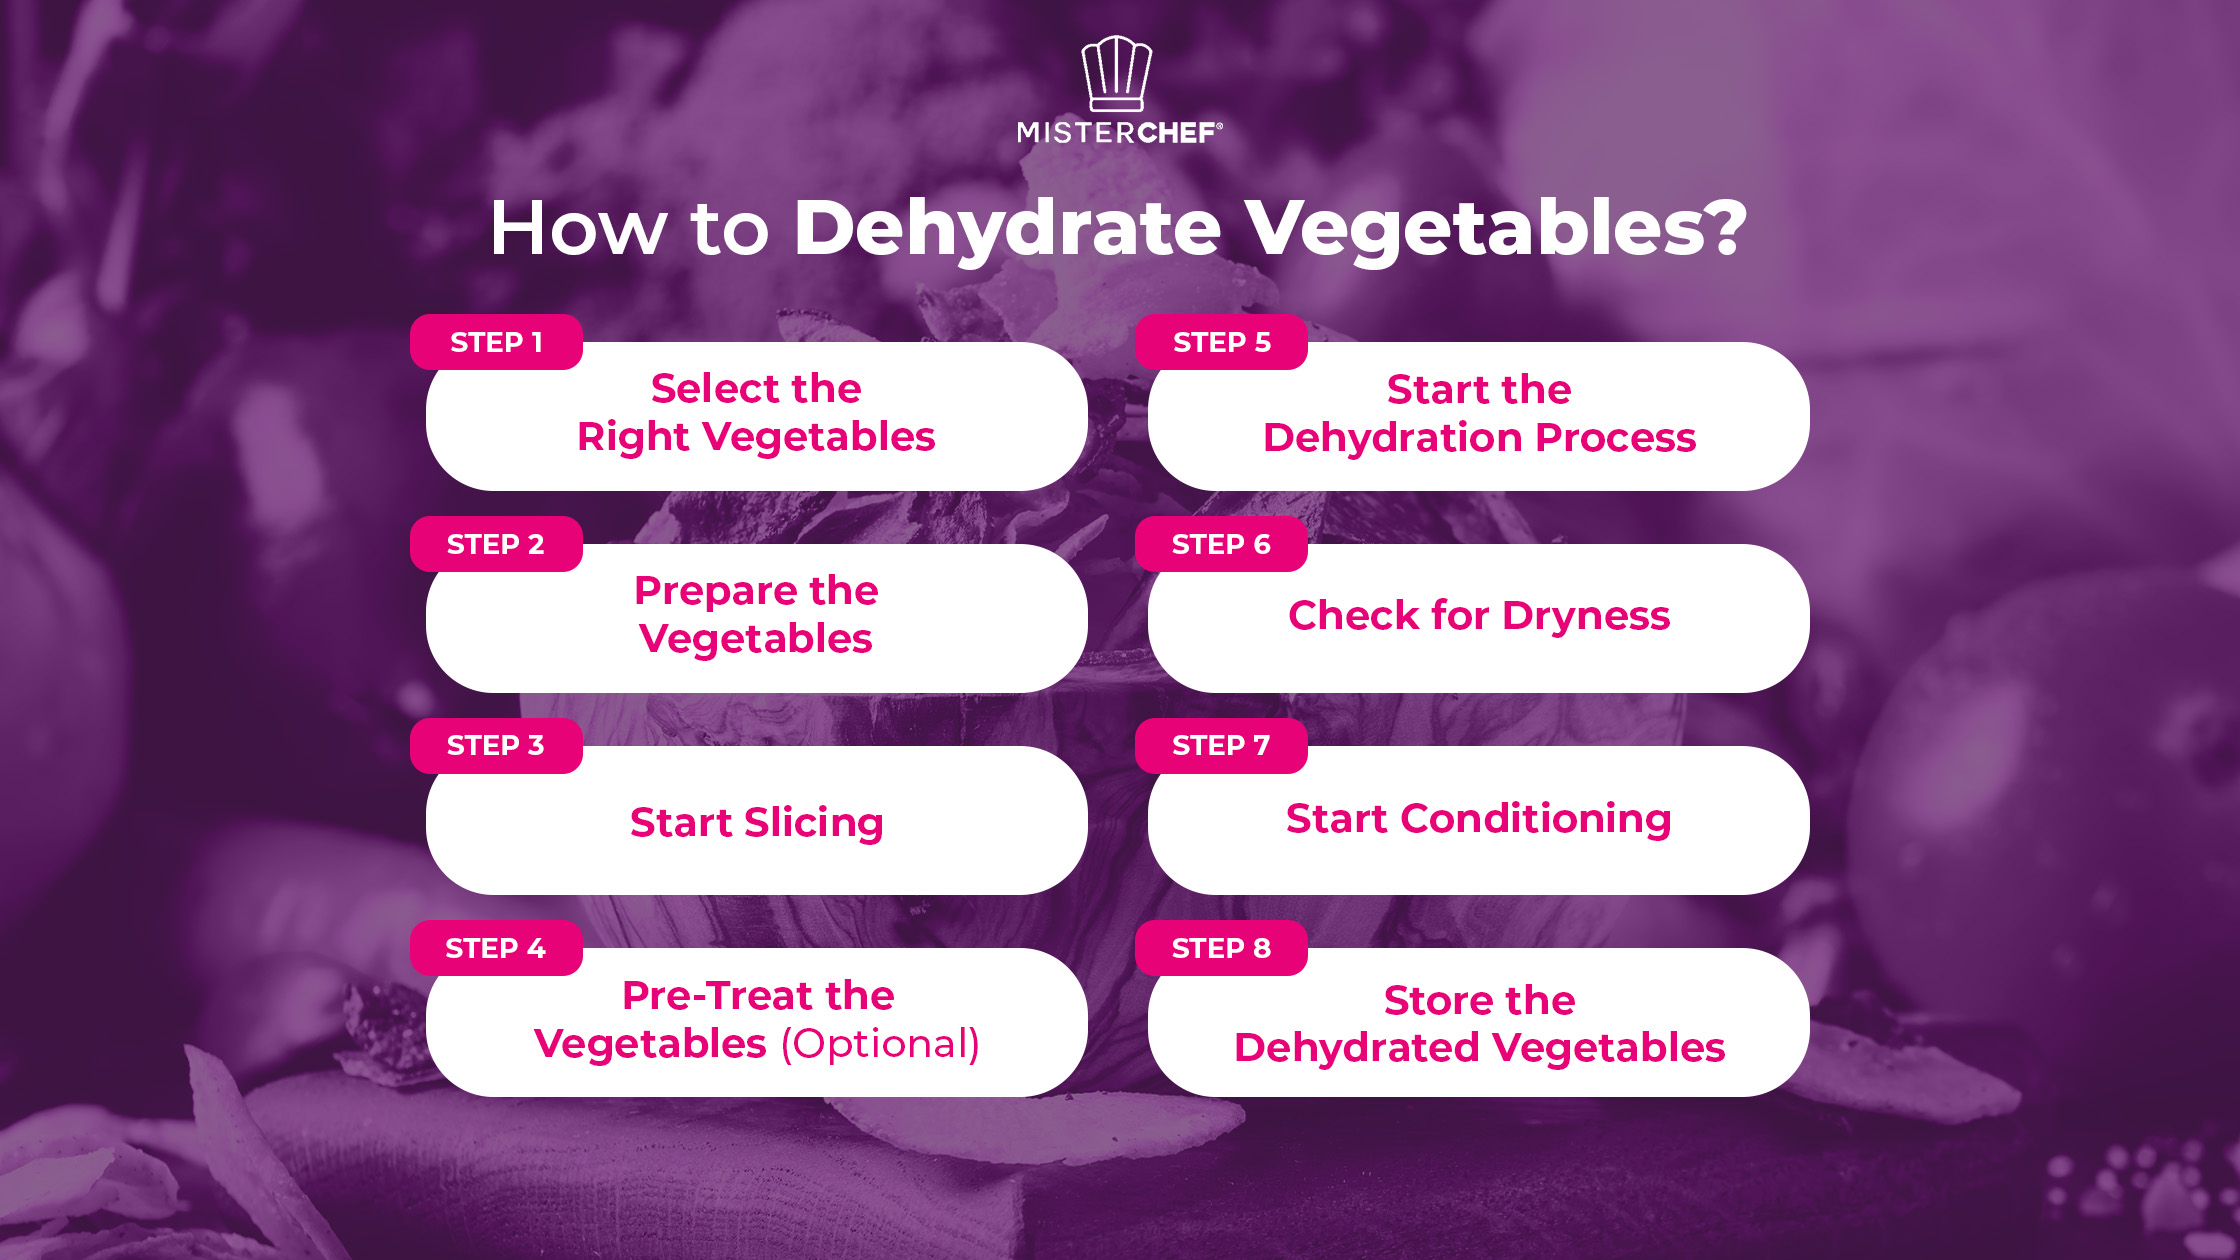
Step 1: Select the Right Vegetables
When choosing vegetables for dehydration, opt for fresh, ripe produce. Avoid using vegetables that are overripe or bruised, as they may not dehydrate well.
Step 2: Prepare the Vegetables
Start by washing the vegetables thoroughly under running water to remove any dirt or debris. For vegetables with skins, like carrots or potatoes, you might want to peel them, although it’s optional depending on your preference for texture and flavor.
Step 3: Start Slicing
Cut the vegetables into uniform pieces to ensure even drying. Thinner slices will dry faster. Make sure they’re about 1/8 to 1/4 inch thick. This is particularly important for denser vegetables like carrots and sweet potatoes.
Step 4: Pre-Treat the Vegetables (Optional)
While optional, pre-treating helps preserve color and flavor. One common method is blanching, where you briefly submerge the vegetables in boiling water, then immediately transfer them to an ice bath to stop the cooking process. This is commonly done for vegetables that tend to blacken like broccoli, cauliflower, and potatoes. As an alternative, you can dip the vegetables in a solution of lemon juice and water for about 10 minutes. Whatever method you choose, make sure that the vegetables are patted dry before starting the dehydration process.
Step 5: Start the Dehydration Process
Arrange the prepared vegetables in a single layer on the dehydrator trays. Make sure they do not overlap and there’s enough space between each piece for proper airflow. Set your dehydrator to between 125°F and 135°F. The drying time can vary depending on the type of vegetable and thickness of the slices; it typically ranges from 4 to 12 hours.
Step 6: Check for Dryness
To test if the vegetables are fully dehydrated, remove a piece from the dehydrator and allow it to cool to room temperature. It should be leathery and brittle, with no signs of moisture when broken in half. If any moisture is present, place the vegetables back in the dehydrator for additional drying time.
Step 7: Start Conditioning
After drying, let the vegetables cool for about 30 minutes to an hour. Place them in a container loosely and shake them daily for a week. This process is known as conditioning and helps to equalize any remaining moisture among the dried pieces to prevent mold during storage.
Step 8: Storing Dehydrated Vegetables
Once the vegetables are fully dried, transfer them to airtight containers or resealable bags. Store them in a cool, dark place away from moisture and sunlight to maintain their quality. Properly stored dried vegetables can last for several months to a year.
Tips and Tricks for Dehydrating Vegetables
To make the process smoother, here are some useful tips and tricks:
- Depending on the dehydrator model, the heat distribution may not be entirely even. To prevent this, rotate the trays periodically during the drying process.
- If your dehydrator trays have large holes, small pieces might fall through as they shrink. Mesh liners can prevent this and make handling delicate or small items like herbs and garlic much easier.
- Always label your storage containers with the type of vegetable and the date of dehydration. This helps in using older stocks first.
Are There Any Other Alternative Methods That You Can Use?

Besides using a dehydrator, there are other methods to dehydrate vegetables that you might find useful, especially if you don’t want to invest in specialized equipment. Here are some of them:
1) Oven Drying
This is a common alternative that uses your conventional oven. Set your oven to its lowest temperature setting (between 140°F and 170°F). Spread the prepared vegetables on baking sheets in a single layer, and place them in the oven. Leave the oven door slightly open to allow moisture to escape and air to circulate. This method can take several hours, depending on the vegetable and oven temperature.
2) Air Drying
This method works best in climates with low humidity. Thinly slice your vegetables and arrange them in a single layer on a rack or hanging net. Place them in a dry, warm area with good air circulation. This method can take several days to complete.
3) Microwave drying
For small batches, you can use a microwave. Place thinly sliced vegetables between two paper towels and microwave them in short intervals of 30 seconds at low power. This method is quick but it needs careful attention so that you don’t end up cooking the vegetables. It’s suitable for very thin or small pieces.
4) Sun Drying
If you live in a very hot and dry area, sun drying is a great option. Spread the vegetables on trays covered with cheesecloth to protect them from insects and dust. Place the trays in direct sunlight and turn the vegetables occasionally. Bring the tray in at night to prevent moisture from settling back in. This process can take several days.
Can You Dehydrate Frozen Vegetables?
Yes, you can. But before you do so, make sure to thaw the vegetables by leaving them out at room temperature or using a microwave. Also, consider blanching the vegetables before dehydrating.
Summary
Dehydrating vegetables is a simple and effective way to preserve them for future use. By following these guidelines, you can create tasty, nutritious snacks and improve your meals with a variety of vegetables.
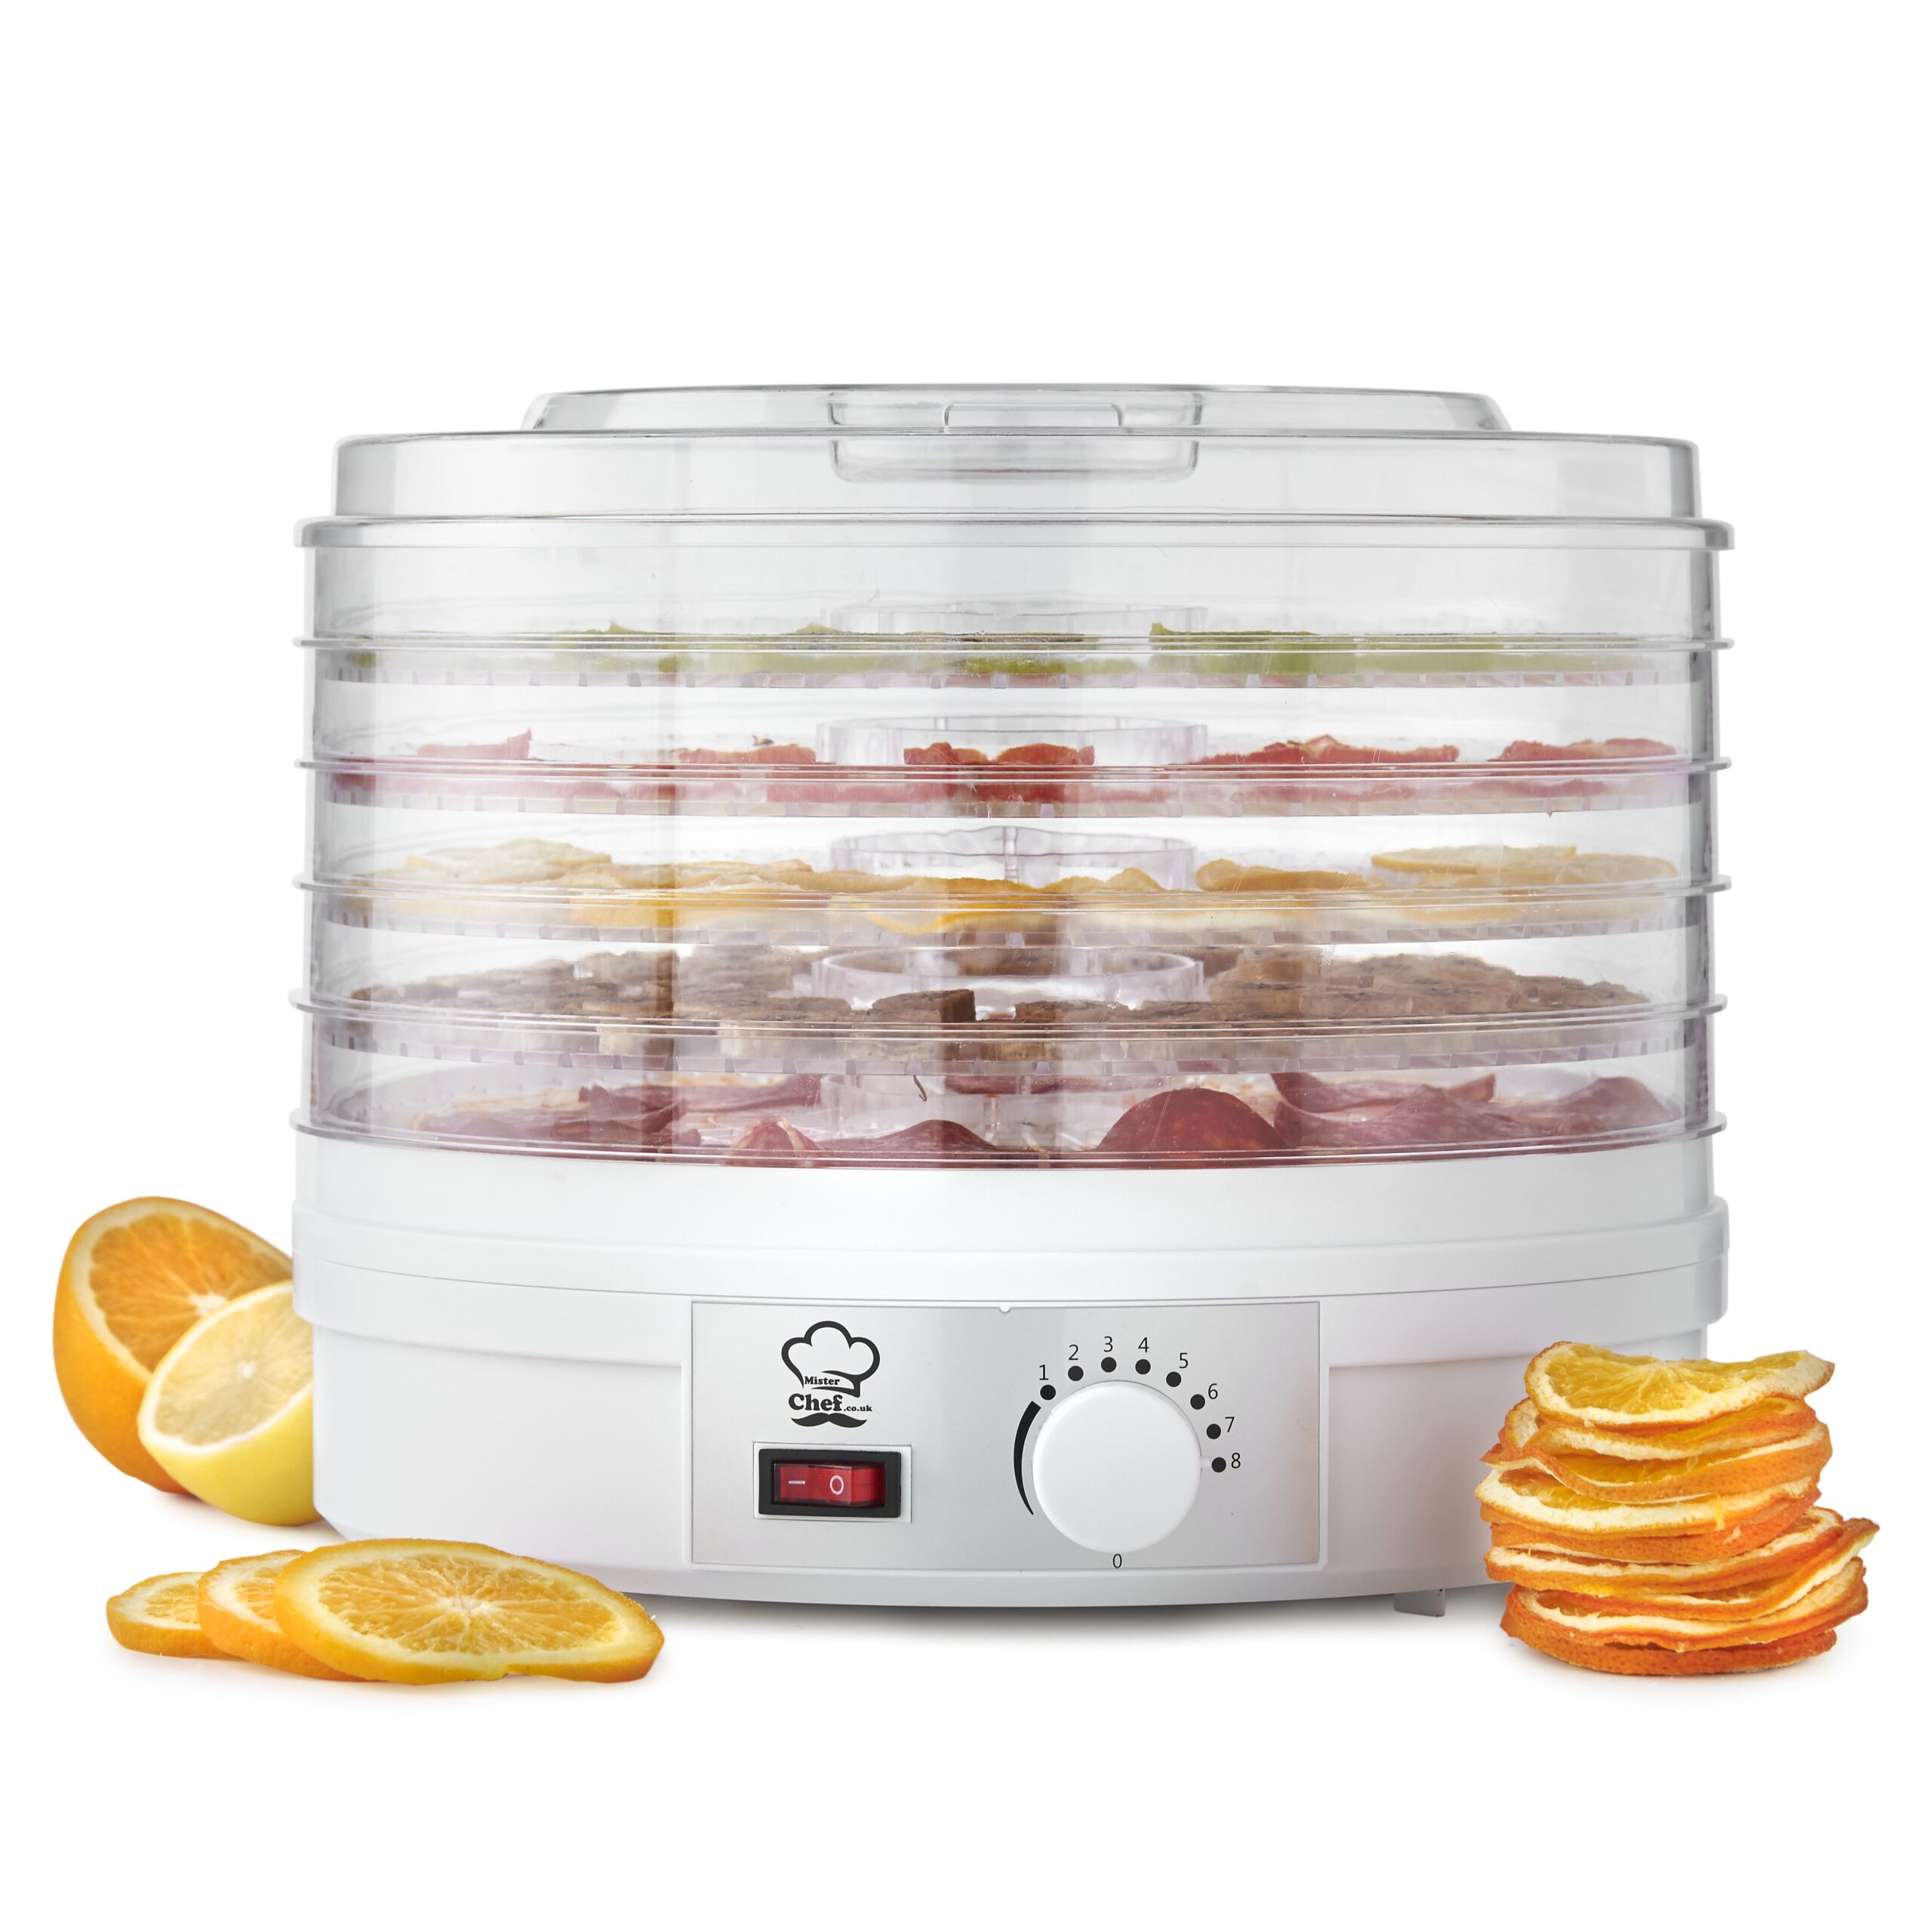
Looking to make dehydrated foods? Try the MisterChef Food Dehydrator! It’s designed to make fruit leathers and dehydrated vegetables, ensuring you get the best results every time. Shop with us today.